Thursday, March 20, 2014

Moving things to a new site!

Still alive! Just super busy. 

I've since relocated to the Houston, TX area and am now employed by Rice University in Miller Lab. Yes, that's the same place I was at for AMRI!

Also, seeing as my interests have moved beyond just the DLP, I figured its time for me to actually create a personal site to keep up with all that I am up to. The new site is AndersonHTa.com, nice and simple!

Bare with me while I'm still transitioning, lots of projects going and lots of things to discuss!


Tuesday, November 26, 2013

New Vat Coatings and People

So far I've tried Sylgard and PTFE film...now I've come across FEP. Some of the benefits you initially see are that it's cheaper and there are various methods for applying it with heat. You can grab some from CS Hyde if you want to experiment too.

I've come across this material thanks to some suggestions from Bobby from Elite Imageworks, creators of the Deep Imager 5 DLP 3D printer. It was a nice surprise to find out that they are somewhat local, looking forward to visiting when they have the time.

I haven't been printing as much due to a dead projector bulb(and a new bulb is more than the projector), but that leaves more time for research! I started to look into a new projector and having seen the Deep Imager 5 and its tiny pico projector on an X/Y system, I wanted to see what was available. Low and behold I came across Steve Hernandez's work. The name might be familiar if you are building/operating a DLP 3D printer, he is the creator of CreationWorkshop tool for slicing and controlling DLP 3D printers (donate if you use it, it's really awesome!)! Oh and guess what...he's a local as well! I've reached out to him in hopes that we can meetup, we'll see if that ever comes to fruition. Steve is also looking into using a pico projector for a DLP printer, really anxious to see what he ends up doing.

So the main thing to take away here is that if you want to do anything with SLA/DLP 3D printing, you should be in the state of Maryland :P.

Before the machine died, it was on display at the Smithsonian's X3D event, unfortunately I was quickly approached about the smell of resin in the air and didn't actually print.


Open3DLP at the Smithsonian X3D Tech Gallery

...this was it's last print before its untimely demise.


RIP Dell 2400MP Projector

Tuesday, November 12, 2013

Back on it!

Well August happened...and then I returned to normal life in Baltimore, MD and settled back into the chaos of working my normal job. Since then, I've had next to no time to dedicate to this project...but as of today. I can proudly say I am back on it!

Kind of helps get you focused when the project is featured in the Make magazine 3d printer special edition  (Out on newsstands today, get a copy, read my articles/reviews :P), being exhibited at the Smithsonian X3D event and ultimately letting down your friend in terms of documentation of your project (Sorry, Jordan! This weekend, it's REALLY, ACTUALLY happening).

So what's the plan for Open3DLP, well for one I still need to do all the testing I had promised and get those quantitative data out in the wild. New vat axis with tilt/slide, I've been brain storming lots of ideas and am going to get fabricating with a few prototypes.

In the meantime, the real action is happening back at Rice where as of last week, their DLP printer is back at it curing resins! Bagrat Grigoryan is heading up that initiative and I know that the project/machine/research will do well with him at the helm.

I'm also looking into getting some custom parts made for the THK actuators I have for platform attachment and machine attachment. On that note, I still have THK's up for grabs if anyone is still interested, 2 pairs (short and long). Message me if interested.

Time to brush off that dust and bring down off that shelf


Monday, September 2, 2013

What a month!

Sorry for the long duration of silence. I've just been super busy trying to put the finishing touches on all the things that went down in August. Which even now, are still incomplete.

I'm back home in Maryland and just trying to get situated before the semester begins at MICA.

So what's happened since the last post?

Ultimately, I'm printing! With MakerJuice...not hydrogels though (thought I did try!). It's still cool regardless.
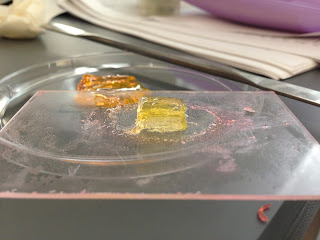
Hydrogel cube! (I cheated and trimmed it to look nicer)
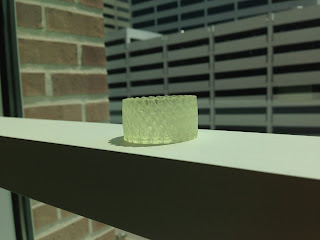
First print was Diagrid Bracelet by Nervous System. I scaled it down a bit, but ran into a slight snafoo there in the software. It scaled only the X/Y but kept all the Z slices...so it was a bit stretched. Layer height was 0.1mm, X/Y resolution is also 0.1mm.


So after the initial success, we had to up the ante and keep on printing. And the thought was to use resin prints to see the complex structures we could form, for which we could hope that hydrogels can also form. So we tried some vasculature forms. And it was still really awesome! Sorry no time lapses, I just couldn't sacrifice my phone for 7 hours.


I tried to up the crazy factor in terms of models, so I dug into some of the test prints I was using for the MAKE shoot out. Thanks to DizingOf for sharing his models with us during that time. What I chose to go with is "The Cube." Sadly, it failed. the issue was that the suction force created was too great for the print to stay stuck after being lifted every time. I am currently operating without a peel/tilt mechanism. I've been lucky because most of the objects up until now had very minimal surface area attachment to the bottom of the vat. So the force to remove the print from the vat was less than that of the force of the adhesion between the print and the build platform.


A lot was learned through these prints, I def need to go back and setup a tilt mechanism. I also discovered that aluminum is def the best choice so far for build platforms. Might be obvious seeing as that's what everyone else uses, but its good to figure it out on your own too.

So you might be wondering, what happened to all those tests I promised? Ultimately, they are still happening, but I just got bogged down with a lot of other things before I could get to the non-bio related things. I promise to keep up on that front.

BUT it might be a bit, August was crazy (good kinda crazy) and September is just as crazy. Open Hardware Summit is this Friday September 6th and I'll be in attendance. The following week, a friend and I are setting up a 3D scanning shop at our local comic book shop. The weekend after that is the World Maker Faire in NYC, it also happens to be my 25th birthday as well! Finally, the last week of September is the mini-Maker Faire for Silver Spring, MD. So kinda busy.
You can thank me later for helping make a future where we can print organs. :)
It's been unreal to have such an opportunity to work with so many great people this past month. It's been really eye opening and I'm excited for what lies ahead. To hold you at bay until next time, here are some glamour shots of the Nervous System Diagrid bracelet under a microscope.

100 micron layer height, 100 micron X/Y resolution 
100 micron layer height, 100 micron X/Y resolution
And to end, none of this is possible without the great community I work with.  A lot of work has been done with this stuff before me and a lot of folks helped to keep me on track with their expertise. And I thank you all for providing all the things that you do. You know who you are!

Tuesday, August 20, 2013

Gettin' It Done!

Those of you that follow me on the many social media outlets we have these days will find this post a bit bland, having seen all the photos and videos already :). For the rest of you that know better than to follow my random rants on the internets, this is the post for you!

So the short course is over, my mind is melted and I probably know more about tissue engineering/regenerative medicine than I ever should (it's not a bad thing!). I've been back in the lab and back at getting the DLP fully constructed (still not 100%, I'm on the Z axis stuff though...last pieces). On top of building things, I started to put together all the other components of my project, like more testing and test models.

Testing, I've been getting trained on a photo rheometer. What's this thing? It's a device that can help determine the polymerization rate of the hydrogel or resin. How does it do this? A small sample of your hydrogel/resin is compressed and spun, while its spinning, a UV light source is introduced to cure your material. Essentially as it cures from the exposure, the friction that is generated between the rotating surface is captured. From there one could extrapolate the time it takes for a liquid to go gel (solid). That's putting it REALLY, REALLY simple. I think I'd just butcher things if I tried to explain it in depth, I've only spent four hours with the machine after all.

The photo rheometer had some issues with the data captured so I wasn't able to get all the data I wanted. It was still a great learning experience to play with such a tool. After all the hydrogels are done, I plan on sampling all the different resins we can get on the market at the moment. From there, the hope is to dial in the light source and get some really precise cure times. On the photo rheometer, I can control the power output of the UV light. From there I can determine specific layer heights by controlling the gap when the liquid is compressed/squished. Put all that together with the right testing method and we should have really awesome cure times with some nice charts and data.

So I have also been curing gels outside of the photo rheometer, but sadly still stuck in 2D land until I get the Z axis going. But it's still exciting! I started out with basic texts just to get a feel for what kind of form I'd be getting, the plan was to then move onto other forms to test other attributes, like fine details and dense areas. First thing I polymerized was the "AMRI" text...and it looked bad ass!


The one thing to take away from this test is how it did on sharp corners. There is some very clear definition achieved. Texts polymerized nice and crisp, and thats with a really thick layer height of about 1mm. The layer heights we'll be working with with be sub-100 microns. So to get such a level of definition with a larger layer height is very promising for when we go smaller layers.

The "AMRI" text was a good test, but it's a very simple geometry. We need something more complicated, something similar to what the end purpose is like. Luckily we had a image of some art work for Jordan's lab (the lab I'm working out of), and on that there is an image of a tree with really dense packing of branches and voids (kind of like vasculature!). One thing you can also notice is the grey scale on the tree. That'll be an interesting thing to look at to see if that has any effect. Which leads me to something I forgot to mention. The hydrogel we are using has a photo initiator that reacts with white light (514 nm) and not the normal UV light (325 nm to 420 nm) we use with the typical resins.

So how did it work out. It worked out absolutely amazing! The dense branches had very clear gaps and spacing. We were able to get really small feature sizes in close proximities. It's really exciting!
I plan on getting the Z axis up today, and have some interesting structure to try out. I think I'm going to try the vasculature torture test Jordan had created for last years World MakerFaire at some point to, since that's a geometry we'd be interested in creating in the end.


Saturday, August 17, 2013

Short Pause for the Short Course

So experimentation and overall work has been on hold since the last post (though I was able to cure some hydrogel! Pics at the end). In addition to having lab access and crazy tools, the fellows of AMRI also get the opportunity to participate in a short course on the Advances of Tissue Engineering. This is a chance to see all the cutting edge research and development going on in the ever changing field of tissue engineering/regenerative medicine in the bioengineering field. It's really something to see the many names you see listed on the papers you have read in person. 


For me this has been a great opportunity to immerse myself in all things related to tissue engineering/regenerative medicine. It's been about 7 years since I last took a biology class or a chemistry class. All I can say is thank god for wikipedia, I'd be absolutely lost without doing a bazillion searches through all the presentations. While most topics were over my head, getting an in depth overview helps to really contextualize things. 

Polymerizing hydrogels is not a new concept at all, it's been done by many researchers. What I think Open3DLP can offer is a much more affordable/adaptable platform for more research to happen. Looking over the basic schematics on different labs setup is really an eye opener. The costs of some of the setups are outrageous, makes me realize why its so inaccessible for most people. 


It cured! Cross-linking success!
Ultimately, how I'm bridging the vast abyss of my knowledge of polymerizing plastic to polymerizing hydrogels is to frame it as just another kind of resin. It is just that, hydrogel is just another kind of resin that can be applied to a DLP 3D printer. Just a different end product reacting with another kind of photo photoinitiator. Simple!


Having a little fun with the new label maker.


Short course ends today and I should get back to the usual grind.


Monday, August 12, 2013

First experiment

Experiments, experiments, experiments. It's part of the reason for participating in AMRI. So what I've decided to capture data on first is power output of the DLP projector I'm using. In this particular case, I'm using the same projectors as the B9, a Vivitek D535.

For capturing the power output, I have access to a power meter and sensor by Coherent. A FieldMaxII meter and a PM150-50C sensor. Couple of points of interest in experimentation is overall power output of the projector, the drop off in power due to to distance from light source and power density per cm^2. 

FieldMaxII

The first point of interest will be useful when I start testing other projector setups, it'll help form the baseline marker for the various other projectors folks would like to use in a DLP 3D printer. The values gathered will also be good to gauge what power levels are adequate for overall reasonable layer/print times. At the moment, in talking with others working on DLP's in the community, the most important aspect folks look for is lumens (followed by native resolution), most are recommending builders work with at least 2,500 lumens. It'll be nice to see the effect of lumens on power output.

Tested Red projection
Tested Black projection
Tested White projection
One of the question I see being asked a lot is how scalable a DLP 3D printer can be. One would think that pulling back the projector and enlarging to projection area would be all that's needed. Sadly, that's not the case at all, and the reason it'll be interesting to see the power output over various throw distances and size prints. There are a lot of hypothesis and ideas, but it'd be nice to get quantitative values to back things up.

Lastly, power density is interesting to me because it'll allow for us to fine tune our exposure times. The thought is that if we can find the power output over an area, we can use that data to help extrapolate cure times for a specific layer height. On the point of cure times, polymerization rate will also be a future experiment.

Experiments like this is what AMRI is all about, applying the scientific method to create quantitative data for the betterment of research and development. The hope is that having empirical data to back up a lot of things that are taken at just face value will help people make advancements and not stumble over the same problems as others have before them. It's all about anchoring a foundation for which contributors can build upon prior research quickly and adapt results for new ideas.